Even with all the nifty CNC (Computer Numerical Control) machines in use throughout the industry, there are still small variances from one machined component to the next. Cutting tools wear, milling machines are precise though not perfect, and there’s always some practical limit to manufacturing precision. When it comes to a perfect scope mount on a rifle, a number of components come into play. To achieve perfection, each of the following components has to be perfect themselves but also in their relationship to each other: receiver, bases (if applicable), rail (if applicable), rings and scope body.
Below is a quick look at some basic tools and methods you can use that’ll help you remove some of the variables from the scope mounting process. Not only can you do a better job mounting optics for your customers, but you can also charge for the service as most end users aren’t going to be equipped to do scope ring alignment and scope ring lapping.
What Is Lapping?
Most scope rings have somewhere between a ½ to 1 inch of surface area contact with the scope tube body. If manufacturing processes had perfect tolerances, every molecule of the steel or aluminum on the ring surface would contact the scope tube body with the same amount of pressure. Looked at another way, that concave ring surface would fit perfectly against the scope body like the proverbial glove.
Since we can assume the fit will not be perfect and scope rings will have slight interior shape imperfections or high and low spots, there are two ways to remedy that situation. First, you could perform a bedding process on the interior of the rings, much like precision rifle builders do to fit a stock perfectly to a receiver. That’s a pain. Second, you can lap the interior of the scope ring surface.
To oversimplify, lapping simple means “sanding” the interior of the ring to obtain a perfectly smooth and precisely shaped surface. Sanding is generally rough and not very exact, hence the kinder and gentler word lapping. Using a perfectly shaped steel rod, one grinds and smooths the rings using a lapping compound until the rings are ground ever so slightly into the perfect shape.
Why Lap The Rings?
There are good reasons for a scope tube and rings to mate perfectly.
Magnified scopes almost always come tube shaped. That cylindrical shape is inherently strong — that’s why aquatic geniuses make submarines out of cylinders — but even still scope bodies can be damaged when you apply pressure while mounting the scope in the rings. Additionally, a poor mount that relies on uneven surface area contact can be unstable or off center.
After one carefully zeroes a scope, the last thing you want is movement during repeated recoil because the ring surface and scope tube don’t have firm contact with each other. When you boil it all down, jamming metal parts into alignment with each other isn’t a recipe for consistent and precise performance. It’s far better to take some extra time to make sure parts fit perfectly.
How To Lap Scope Rings
First, double and triple check to make sure the rifle is unloaded. It’s then helpful to mount it in a vise or rest as you’ll need to apply some pressure during the process.
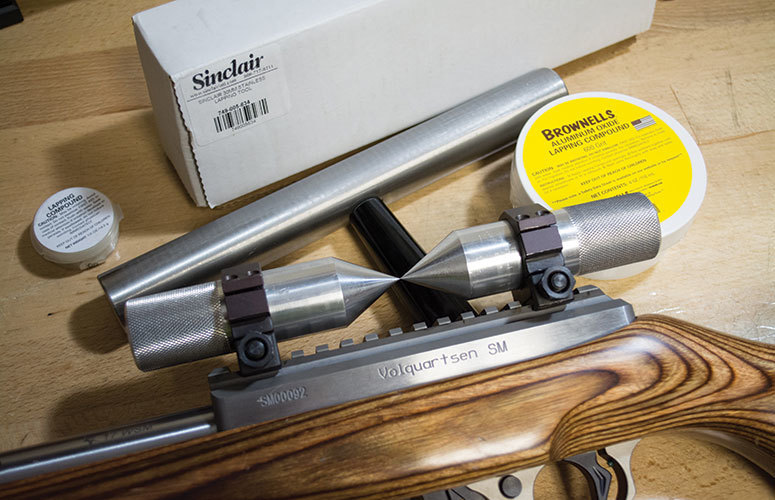
Before you start into the sanding and grinding process, it’s a good idea to check scope ring alignment. For this, I’m referring to alignment with each other, not alignment with the receiver or bore. To see if your rings are in line with each other, you can use Brownells Scope Ring Alignment Rods.
The idea is that you mount one rod in each ring, with the points almost touching each other and tighten the rods into place as you would your scope. If the rings are properly aligned with each other, the two points on the rods will be exactly opposite each other. These rods come in different sizes for 1 inch and 30mm scope rings — so get both. Or you can invest in a set with removable sleeves that allow them to work with a variety of ring sizes.
If the rings aren’t aligned, you can take some corrective action depending on the type of scope rings you’re using. If the rings have windage adjustments, that will allow you to correct any side to side misalignment. If it’s a vertical alignment issue, you can use shims under the scope bases or rail. If you’re using non-adjustable rings, you can also try swapping positions or rotating them 180 degrees on the rail. Using whatever method your rings allow, get them as aligned as possible before lapping.
After you’ve dealt with any alignment issues, make sure the rings are firmly mounted to the rifle. Then you can place the whole rifle in a vise or support. Also remove the top halves of the scope rings, if you haven’t already. There are two schools of thought on whether to lap rings with the tops installed or to just lap the bottom halves. In this case, I’m doing just the bottom halves.
Since you need to apply a bit of pressure, I don’t think you’re going to get a great lapping action on the tops anyway. Besides, they’re more flexible than the bottom sections and more likely to form fit themselves during mounting.
Next, apply some aluminum oxide lapping compound to the surface of each of the bottom rings. Don’t use silicon carbide as that won’t come off of the rings easily so it might mar up the finish on the scope tube.
Now using some semi-firm pressure, work the lapping rod back and forth across the ring surfaces, taking care to make sure pressure is even and consistent. Don’t force it — if veins are popping out on your arms, lighten up the pressure! It’s also a good idea to rotate the rod a bit as you move it back and forth to make sure you’re getting good surface area contact.
Before long, you’ll start to see some gray gunk accumulating on the rod. That’s most likely the finish on the scope rings and a bit of metal coming from the interior of the rings during the lapping process.
There’s no sure way to know when you’re done other than looking, and need to clean the interior of the rings for inspection more than once is a possibility. If so, that’s OK; the goal here is to develop a perfect fit, so take your time.
When you clean the lapping compound from the rings, you’ll see shiny areas where metal and finish have been removed. That shows you that the process is working. The Sinclair International folks advocate a 75 percent rule of thumb — meaning that when 75 percent of the total interior ring surface area has been polished off you’re probably in pretty good shape and can stop the lapping process. I include some before and after pictures so you can see where these particular rings have been corrected.
Be sure to clean the rings thoroughly. The lapping compound doesn’t wipe off very easily with just a rag, so you might need to use a degreaser of your choice to clean up the mess. Also, since you removed the surface finish you might want to apply a very light and thin film of metal protectant. I wiped these with a rag treated with a tiny bit of Gunzilla since it does a good job of protecting against corrosion and dries well — it doesn’t leave a slimy mess like regular oils.
Now that the lapping process is complete, you can mount the scope as normal, knowing it’ll live up to its full accuracy potential and be less likely to shift around over time and repeated recoil. You’ll also notice that the scope tube body won’t get scraped and scratched from the rings. It’s a win-win.