If you want to improve the performance of a Glock, there are two areas to address: the trigger system and the sights. Neither offers any mechanical improvements that will make bullets fly straighter, but each will make the pistol easier for your customers to shoot well. That’s worth the money.
Selling these improvements requires knowledge about what they will do for the customer and how to install them. Fortunately, both are simple and with that expertise, selling profitable upgrades is a no-brainer.
Range Master in San Luis Obispo moves a lot of Apex Tactical Trigger kits. In the words of one former employee who performed lots of upgrades, “Ten Smith & Wesson Shields come in; nine go out with upgraded triggers.” That’s an add-on sale of $159.95 per gun. The upsell worked because that person could install the upgrade in minutes — no gunsmith appointments or long waits for a customer to get their gun back.
This time, let’s look at opportunities to sell upgrades not only to new gun buyers, but existing owners. There are well over five million Glocks in the field worldwide. While no one knows exactly how many reside in private hands in the U.S., the number, and your sales opportunity, is arguably huge.
The tools for Glock upgrades are basic. You’ll want a bench block to hold parts while removing and inserting pins, a Glock front sight tool like the Brownells Magna-Tip model, a Glock pin punch and a Glock-compatible rear sight pusher tool.
Change the Trigger
Once you shoot a good trigger, you never go back. With handguns, the pull weight of the trigger usually exceeds the weight of the gun itself, so a quality trigger movement makes a huge difference in how well the user can control the handgun.
For this example, we’re going to use the Apex Tactical Action Enhancement Kit for Glock Pistols. It contains an improved anodized aluminum trigger, trigger bar, connector and safety plunger. All of this together should lower the pull weight by about a pound, shorten take-up and overtravel and provide a crisper trigger break. While we’re at it, we’ll swap out the black trigger for a custom color model. What’s wrong with a little cosmetic personalization?
The initial pull weight on this Glock 19 Gen IV averaged 5.75 pounds. It traveled through almost 3/8-inches of gritty take-up before encountering serious pressure, then an additional 1/4-inch of travel before the break. It would reset after 1/4-inch of rough forward travel with an audible and tactical click. Let’s see how much we can improve things.
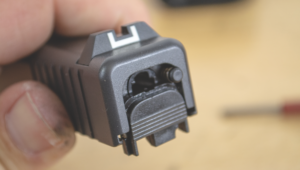
After field stripping the pistol and verifying that all ammo is safely cleared, you’ll need to remove the existing trigger assembly by removing three different pins: the locking block pin, the trigger pin and the trigger housing pin. All are removed from left to right.
Before we start, we’re going to modify the Apex Trigger and trigger bar assembly, but only because we’re going to replace the black trigger face with a red one for cosmetic reasons. Just drive out the trigger hinge pin from left to right. The new trigger face has a pin halfway installed, so align the trigger bar and gently push the pin into place with a vise until the pin is flush on both sides. Here’s a trick to protect those gun finishes: Cut small aluminum strips and tape them over the vise jaws. They’ll help protect parts from gouges and scratches.
Take the slide lock lever out, then remove the locking block and trigger housing.
The Apex trigger and trigger bar installs as a single unit and connects to the existing trigger mechanism housing. Just rotate the old trigger bar up and out of the housing and disconnect it from the spring. The new one goes right back in the same way. But first, we have to replace the connector bar with the replacement that comes in this kit.
The connector just slides into the trigger mechanism housing with pressure. You may need to use a pin punch to knock the old one out from the opposite side. Slide the new one into place and you’re good to go.
Next, connect the new trigger bar to the spring and rotate it into place just like the original.
Now insert the new assembly back into the frame. As soon as that’s in place you can install the trigger housing pin in the rear of the grip. Then insert the locking block and locking block pin. Remember to insert the trigger pin about half way as this pin travels through the slide lock lever. Once you place the slide lock lever, you can fully seat the trigger pin.
The results? We lost about 1 ½ pounds of weight on the trigger. More importantly, it’s much smoother with a shorter action. The take-up, now grit-free is now about ¼-inch followed by 3/16-inches of pressure to a good break. The reset happens in just over 1/8-inch with a noticeable click.
Safety plunger and extractor
Replacing the safety plunger can really help smooth out the trigger action, so we’ll do that too. While we’re at it, we’ll pop in an Apex Tactical Failure Resistant Extractor since we’ll be working in that area anyway.
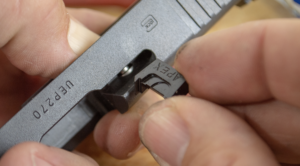
Replacing the safety plunger and extractor isn't difficult. (Photo: Tom McHale)
You’ll need to remove the slide backplate. To do this, remove tension by pressing the firing pin housing towards the muzzle. Keep your thumb over the backplate area to prevent the extractor plunger and spring from flying.
Remove the extractor plunger and spring. You can also slide the striker assembly out at this time.
Now you can push up on the safety plunger to relieve pressure on the extractor and remove that part. Then the safety plunger will also drop out. Take care not to lose the plunger spring.
Place the existing spring on the new plunger and reinsert it into the slide body. While pushing the plunger into the slide, you can drop the new extractor into place. When you release pressure on the plunger, the parts will lock into position.
Be sure to use the new spring with the extractor plunger. Now you can insert both the striker assembly and extractor plunger and spring back into the slide. Pressing both into the slide body, ease the slide backplate into position.
That’s it. Now be sure to function test everything before putting the gun back into use.
Don't Forget the Sights
Standard Glock sights are white dot affairs made of polymer. They work fine, and I’ve never had a durability problem with the plastic construction, although I’m sure that can be a problem for hard use scenarios, but there’s room for improvement. We’re going to do just that by installing the new XS F8 Night Sights model on this Glock 19 Gen IV pistol.
The XS F8 Night Sights rear sight is a black notch design with rounded corners on the bottom notch area to draw your eyes to the top of the notch for quick alignment. (Photo: Tom McHale)
The XS F8 Night Sights are brilliant and some of the fastest sights I’ve tested in a wide variety of light conditions. The wide front post features a large circle filled with a carefully chosen shade of dark orange paint for fast visibility in lighted conditions. It’s also photoluminescent, so it picks up light and glows. That’s helpful for transition from light to dark, as when entering a building. In the center of that is a tritium vial that glows brightly in dark conditions.
The rear sight is a black notch design with rounded corners on the bottom notch area to draw your eyes to the top of the notch for quick alignment. The notch is wide, allowing more daylight on both sides of the front sight view for speed. It also sports a tritium vial under the center of the notch for proper alignment in dark conditions. In short, these sights are easy to acquire in a broad range of conditions against a variety or target backgrounds.
Fortunately, Glock sights are easy to replace, especially when you invest in the right sight pusher tool.
The front sight screws into place through the frame. While the XS F8 sights include a small hand tool to remove the old sight screw and replace the new one, a proper tool is handy if you’re going to do this a lot. Just remove the screw from the inside of the slide and the front sight will come off.
Use a little bit of red thread locker around the hole where the new front sight drops into place as well as on the threads of the replacement front sight screw, then finger-tighten into place.
That’s all there is to it for the front sight. You can keep the old one as it’s perfectly reusable.
Using the sight pusher tool, drive the existing rear sight out. It doesn’t matter which direction. Once the sight is removed, use some degreaser to thoroughly clean the rear sight dovetail in the slide, then make sure it’s completely dry.
Apply a strip of red thread locker to the bottom of the dovetail area.
Next, slide the new rear sight about halfway into position. Then you can drive it the rest of the way using the sight pusher tool until it’s centered. Sights will vary by brand, but these XS F8 sights have two Allen screws that help tighten the sight into the dovetail. When you have the position perfect, tighten the screws and let the thread locker set.
These upgrades are super simple to do, and with a bit of practice you can complete all of these steps in 15 minutes give or take. That allows you to offer this type of service right in the store — no need for customers to leave their guns in the shop. That adds plenty of incentive to those impulse buyers.
According to the Apex Tactical team, when they visit dealers to do install events and train store staff to complete the upgrades, customers line up for the upgrade service. During the 4-hour events, participating dealers drove new sales equal to 30 to 50 percent of their previous year’s total Apex Tactical business. That’s because the sales barrier is in the installation.
Whether you decide to sell at full MSRP and offer a free install or charge for the service, it’s a great way to add easy revenue with both new gun sales and existing guns. When customers have to install their own, the process is just intimidating enough to prevent that sale. Fortunately, that’s an easy problem for you to overcome.
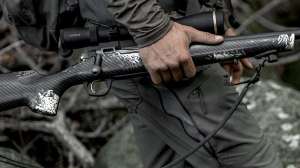
Featured image: Tom McHale